The garage has been pretty full lately with projects and I kind of messed up my scheduling this week. Last weekend I was deciding which cars to work on. I had the Subaru, the Bug and Dixie's Honda. I knew Dixie's van was going to be down a couple days when I did the struts so I decided to work on the bug and then the Subaru. I made appointments for the van and the bug to get alignments done 3 weeks ago. (My alignment shop had a 3 week wait to get in.) I thought I had made them for Monday and Tuesday of next week. That played into my decision of waiting on Dixie's van because I figured I had the weekend to get it done. Anyways I finished the bug up. I had to adjust the steering box and I raised it up a click for driveability reasons. With that out of the way I started on the rear wheel bearing of the Subaru. I almost finished that up on Monday. I just had the parking brake shoes to put on and then the brakes and wheel. Wednesday I was at work and looked at my phone. I had a little calender thing on it that I had never seen before. It happened to be a calender event reminder. (That shows how much I use my phone.) I looked at it and it said I had an alignment for the van on Thursday at 9AM and another one for the bug on Friday at 8AM. I am not sure why I had it in my head that I made the appointments for Monday and Tuesday. The bug was ready to go and just waiting for the alignment so I called Russ's Alignment and asked them if I could change my 2 appointments around so the bug was on Thursday and the van on Friday. They said it was no problem so now I just needed to get the struts done by Friday morning. No problem.
I took ED down today to get him aligned and I pulled into the parking lot just as this Lamborghini Countach was leaving. I told you Russ's was the place to go. Where else can you get an alignment done on a 1969 VW bug right after a Lamborghini. Ha Ha!
Russ himself did the alignment on Ed. I have said it before and I will say it again, If you want good honest work done on your car, Russ's Alignment is the place and yes he is worth a 3 week wait! Ed is in the back of the shop getting all straightened out. I had totally guessed on the tie rod lengths because the new beam I installed had narrowed tie rods. I had nothing to go off of as a reference because of that. It drove straight and the steering wheel was centered but I did notice that it drove better after I got a real alignment done.
.jpg)
OK, back to the Honda now. I did the drivers side strut last night but I didn't get any pictures because I was in a hurry. I still didn't get very good pictures today on the passenger side because I kept forgetting but I did get some. I thought about pictures just after I removed the strut so here is the strut removed from the van. This is really easy to do. Remove the brake line bracket, the wheel speed bracket, the torsion link, the 2 pinch bolts on the lower part of the strut and then the 3 nuts on the top of the strut. It will then literally fall out of the van and look like this.
I planned to change the stabilizer links and the bushings on the stabilizer bar at the same time. It's a good thing to do because they are most likely going to be corroded like mine were. I had to chisel mine off with a rivet gun.
Here is the lower part of the link that goes to the stabilizer bar. I bought MOOG parts. The new links I have are greasable which I like.
This is under your hood. Remove the 3 caps that cover the nuts for the top of the strut. You could remove the whole plastic piece if you want to but I had no problem getting the nuts on and off just using the caps.
Here is the steering knuckle. The 2 pinch bolts go through where the 2 holes are.
Like I mentioned earlier, I changed the rubber bushings on the stabilizer bar. Here is the old one before I changed it.
This is the strut mount on top of the strut. You can see the FR stamped into it in the picture. It will save you time and frustration if you mark where that is on your upper spring seat. Your new strut mounts will most likely not be marked so this will allow you to match them up and mark it before you try to install it into the van. This will only go in one way so if you don't line them up you have a 1 in 3 chance of getting it in the right spot and it sucks to reach up in the wheel well and turn the mount. (Ask me how I know!)

You can buy your struts completely assembled with new springs or you can buy them bare like I did. KYB did not offer them fully assembled and I am way too cheap to go that route anyways. I think Monroe and Gabriel offers them but I wouldn't put them on my van. I like better quality. I am a parts snob if you couldn't tell. These Honda vans have pretty big springs. Get a good spring compressor because you will need it. I used the clam shell type and it worked pretty good. I still had to press it a little by hand to get the nut started but it wasn't too bad. I would be leery on the cheap 2 piece type spring compressors. I had a buddy use them on a Subaru and they ended up spinning on him and he ended up taking them to a shop that charged him 2 hours labor to remove them. He was lucky he didn't get hurt. If you don't have access to a good spring compressor, you can always take your struts to a shop and have them removed and installed on your new struts for a fee.
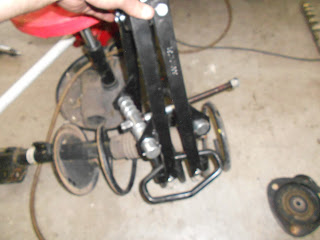
Here you can see the spring with the compressor installed. I have just removed the spring mount.
Both of my spring mount bearings were bad. I had a squeak when I turned and it has been bugging me for a long time. These bearings are what caused it.
Now for the fun part, installing all the new stuff. Here is the new strut with the bellows and bumper installed. I bought new bellows and bumpers. You could reuse the old ones if you needed to.
Here I am matching up front of the spring mounts like I mentioned earlier.
New bearing installed on the upper spring plate.
Take some time to match up your spring to the correct position where it was originally. Make sure you put this washer in the strut also.
Lining everything up and I am now ready to install the strut mount.
You can see here that I have the mount on with the upper washer. I had to sit on the thing to get the strut up enough to get the nut started. It probably looked funny but it wasn't too bad. Make sure you install the washer with the lip facing up like it is pictured here.
Nut started here. We are cooking with peanut oil now!
Use a crows foot and wrench to torque the nut to 33 ft lbs. Remove the spring compressor now.
Put the strut in place and install the 2 pinch bolts loosely. I like to use some corrosion inhibitor on the bolts. You can also hook up the 2 brackets that were removed earlier.
Now push the whole assembly up into the 3 holes that are in the body. This is where it really works out slick if you aligned the strut mount properly. If you did it should go right into place. If it doesn't you may have to adjust it a little. If you didn't mark it you have 3 chances of getting it lined up. Don't worry though because it will only go in one way so you can't mess it up.
I always get to this point and I don't have my jack handy so I grab anything that fits under the lower control arm. This keeps everything up so the studs stay in the holes. You then move up top and put on the nuts. At this point grab your floor jack and put it under the control arm. Lift it up carefully until the body just barely comes off the jack stand. You can now torque your 2 pinch bolts and the 3 upper nuts on the strut. Now is when you will be glad you bought new stabilizer links because you will have new parts with new nuts. Install them and the wheel and your done. Make sure you get it aligned and your good to go. I like the way the new struts feel and the squeaking in the steering is completely gone. I am happy and hopefully Dixie will be happy also.

I had time to get the lawn mowed, get my hair cut and then the family hit the cruise night at Arctic Circle. There were a lot of cool cars there but we forgot the camera. I did happen to get a picture with my cell phone of Isaac next to this Buick with a straight 8 in it. The engine was really really long! In fact the whole car was long. I liked it a lot!
The best part about the rush job I had to do to keep my alignment appointments is that I now have the whole weekend free. Woo Hoo! Now maybe I can get my garage organized and my ceiling fan installed on Saturday. Check back and see if anything gets done tomorrow.
.jpg)
.jpg)


.jpg)
1 comment:
They said it was no problem so now I just needed to get the struts ... strutscompressor.blogspot.com
Post a Comment