I installed the starter on the International tonight. I have high hopes of getting it running soon. I know there are things that need to be addressed but I want to make sure it will run before I get too involved in fixing the other problems. I wish this picture could do justice on how heavy duty this truck is. You can't really tell but the flywheel on this truck is HUGE. It's really thick and beefy. I am amazed that it looks so good because the Bendix gear on the starter was trashed. I figured the flywheel would be chewed up but as you can see it looks to be in great condition.
The 2 bolts holding it on are huge also. It takes a 3/4 inch socket to install them.
Here the starter is installed it's ready for the battery to be installed. This pickup is 6 volt with a positive ground so I need to think backwards to make sure everything is hooked up correctly. Ha Ha.
I did a little bit more investigating. The generator looks pretty rough. I will see if it will put out a charge when I get it running. I am going to replace the fuel filter and the run new fuel lines before I start it. I am planning on just starting it off a gas can to make sure it will run. I then will take the time to clean the fuel tank and replace and clean the other fu lines after that.
The oil actually looks amazing considering how long it has sat. I figured it would be sludge but it's not. I am going to squirt some oil in the cylinders before the first run just to make sure everything is lubed properly.
The engine is very greasy on the outside. I am hoping I can get it running and driveable then I will drive it to the car wash and degrease the engine. I am debating on whether to pull the carb and rebuild it or at least clean it up really good or try to run it the way it sits. Maybe I should see if I can even locate a rebuild kit for it. That might make the decision for me.
The radiator is in rough shape also but the antifreeze looks good in it. I am pretty sure I will have to take it down to a radiator shop and have them go through it. Again, I will worry about that after I know it will run.
This is the oil filter. It's different from what you see on cars today. I am going to have to figure out how to clean this because I really don't have a clue.
Here it is installed in the housing. I think I will change the plugs out also before the first start.
The distributor looks OK and the points are moving good. I may change them. I will at least check the gap on them.
The rotor looks bad so I am definitely going to change that out.
I am excited to start the engine up but I don't want to cause damage by not doing it properly so I am going to take my time and make sure everything is OK beforehand. My Dad bought me a service manual for this pickup. It is a nice one that the dealer mechanics used back in the day. It has over 600 pages and I am really happy. I already can see a ton of questions I have on this truck and that manual will be a great help. It should be a lot of fun getting this old girl to run. I am having doubts on keeping the drive train all stock when we have better technology that is available. I think that the 50's technology is what gives this truck a lot of it's charm. If I can get it running and driving safely and keep up with cars that are on the road today I will keep it the way it is. If not, well then I will convert it to disc brakes, power steering, and a small block V8. Time will tell.
Tuesday, July 9, 2013
Saturday, July 6, 2013
Cache Valley Cruise and the quest for a new hat!
I had been debating on whether to go to the Cache Valley Cruise In in Logan this weekend. I wanted to go but there is always too much stuff going on at home and I had a good opportunity to get some of that stuff done. Anyways, I took a good long look at my hat and decided that I REALLY need a new hat. That was enough of a reason to go to Logan with the family, look at some cool cars and search for a new hat. I really like my Route 66 hat. I have actually owned 3 of them. I buy them from a little roadside store that is between Phoenix and Tucson Arizona. I haven't had the opportunity to get back there to get some more hats and I am in desperate need of a new one so we set off on Friday headed to Logan. Here is my grungy hat. It is actually embarrassing when I get sent on a road trip at work and get on a plane with this hat. It is borderline gross but I really, really like it. I am a creature of comfort and this hat is comfortable to me. Anyways, on to the car show.
The weather was great up in Logan and the hot rods were all over the place. This little truck caught my eye. I would never of chosen these colors if I was thinking of colors to paint this truck but that is what caught my eye. They looked amazing on it. We saw this truck cruising in Logan later that night and it looked even better on the road.
This old truck was cool. I liked the way it is chain driven. Isaac liked it also.
Here is a front shot of the same truck. It was owned by Burton Lumber. It is a cool old Mack truck.
I thought Ellie would like this car. Pink is her favorite color and this car has A LOT of pink on it.
Isaac is always acting like James Dean. Ellie just wanted to hug his legs. It is a cool rat rod also.
Another rat rod at the show. I always gravitate towards these. I like this one because it's different. Most rat rod tops are chopped a bunch and that makes them hard to drive and they are not comfortable to sit in. If I ever build one I want to be able to drive it everyday. This one looks like it would be a OK to do that in.
The owner of this WWII jeep let Isaac and Ellie sit in it. He was really cool and explained all about the jeep. The kids had a blast sitting in it.
Ellie thought these little chairs were put out just for her to sit in. This Coe was cool. If I ever win the lottery I will have one of these trucks in my collection.
This was Steven's favorite car at the show. I like the color. My first car in High school was this color.
I had to get a picture of a Hemi in a cuda. This is something you don't see everyday.
This was the coolest bug in the show. I watched it pull in and then checked it out later in the show. It's a little bit lower then mine but not much.
This is a vendor selling ice cream. They make all their ice cream using a hit n miss John Deere. They also call these johnny poppers. I had a good time checking out the old engine. Steven liked it also and wanted some ice cream. We figured we would get some Aggie ice cream up on campus so we skipped the ice cream at the show.
I caught Isaac checking out this girl. Ha Ha. He told me he was looking at the inside of the car. It cracked me up.
Ellie had to pet every dog at the show. There were quite a few so she was able to pet all of them. The owners were very cool and all the dogs were well behaved. She even got a kiss from one of them.
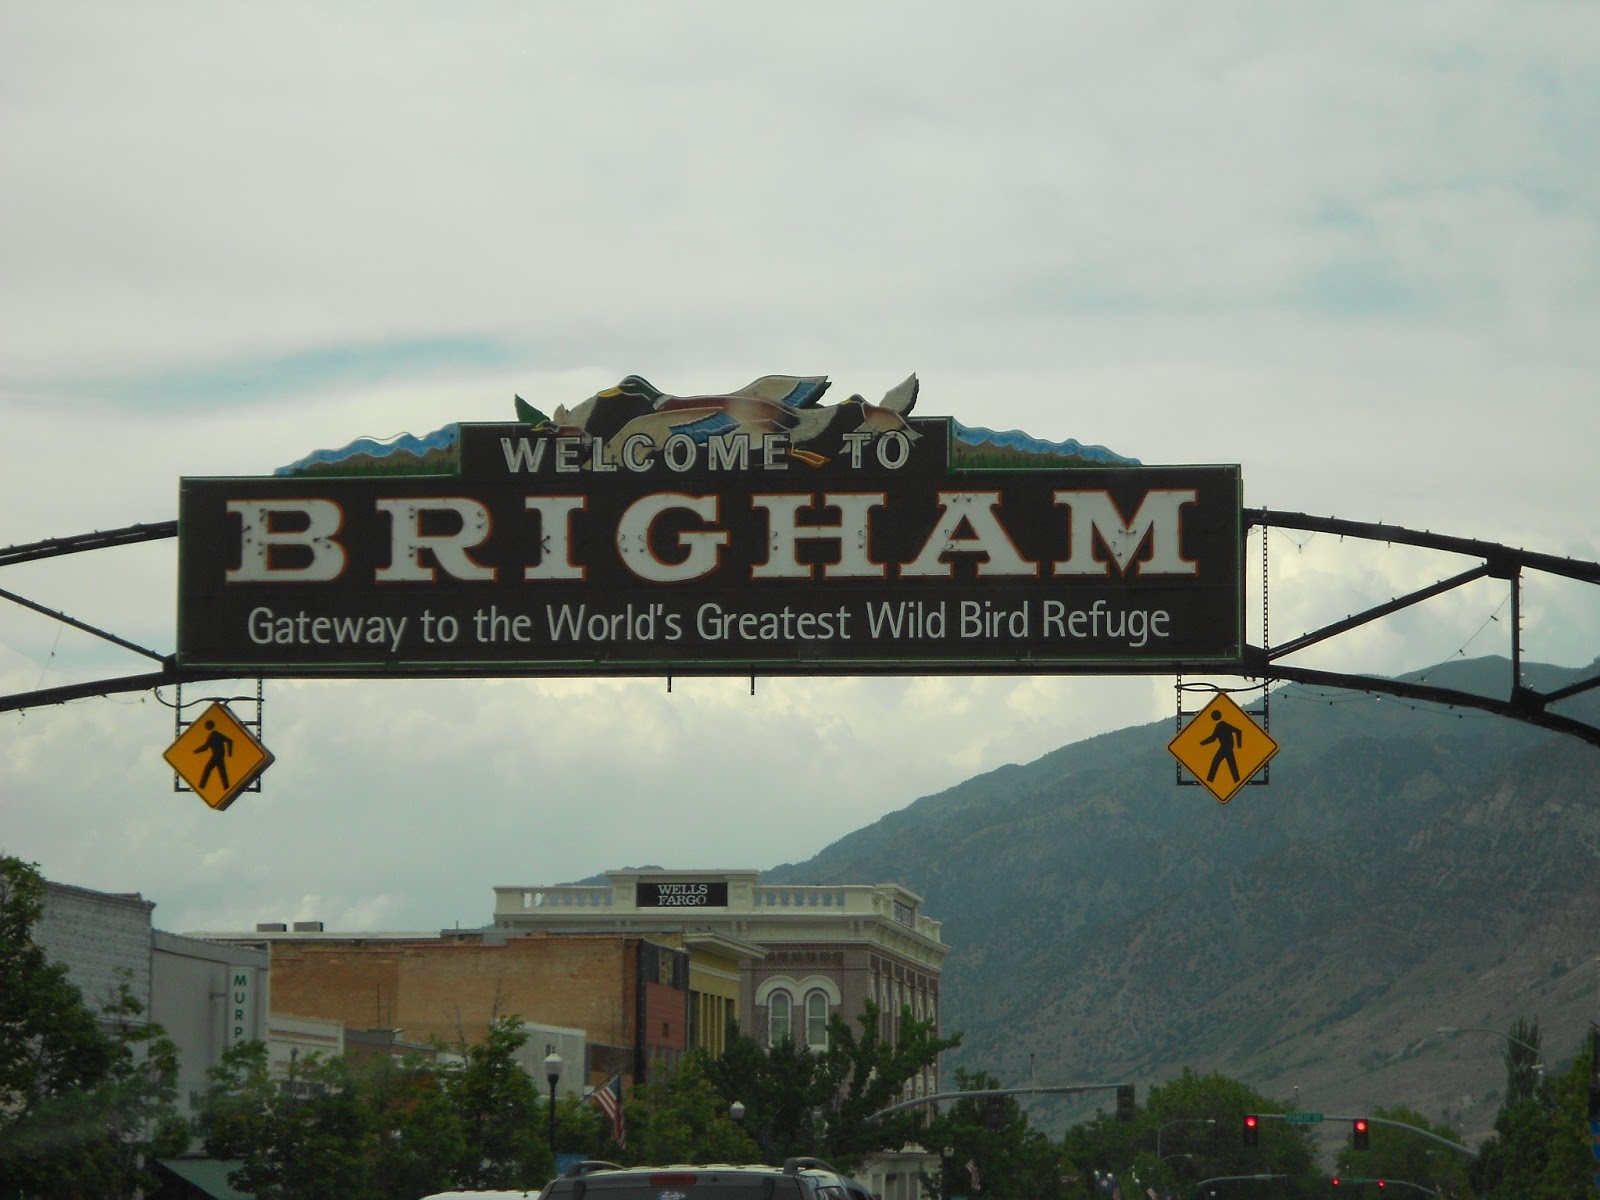
We went to Aggie ice cream and the line there was clear out the door. I didn't want to wait in line so we left. I remember my parents talking about a good ice cream place in Brigham city so we cruised there to check it out. Here is the sign on Brigham main street. I never knew Brigham city was the "Gateway to the worlds greatest wild bird refuge". This sign was lit up at night and it looked cool but the picture didn't turn out.
This is the ice cream shop we hit. It was built in the 40's and the food and ice cream was awesome.
I got a chili dog and everyone else got hot dogs. We didn't know it but they were foot long hot dogs. Lots of food and everything was really good.
Steven said he had 2 hot dogs in 1. He ate half of it before I took this picture. He liked sitting at the bar.
We got fries for Ellie. She loved them. They were some of the best fries I have had. I only got a couple because Ellie ate most of them. This picture shows how tired Ellie was form the long day.
This was a good picture but my camera is slow and by the time it took the picture Ellie was headed somewhere else.
I searched and searched and this was the only hat that I found at the car show. Luckily it is cool and it will replace my good ole route 66 hat. It is a little bit wild for my taste but I like the way it fits and that is whats most important!
All in all it was a fun day. It's always a good day when you can spend it with your family, outside enjoying the weather and at a car show to boot.
Thursday, July 4, 2013
Saturn Vue Wheel Hub Replacement.
I had the opportunity to work on a Saturn Vue today. The left wheel bearing was going out and it needed the stabilizer links replaced because they were worn out. I seems like the shop has been full of suspension work lately. On a Vue you cannot just replace the wheel bearing. They only sell the whole hub assembly. I was annoyed at first by that but after replacing it I think it is a pretty good way to go. The hub assembly is not a whole lot more then some wheel bearings out there and you don't have to mess with pressing the hub out of the bearing and all the associated seals involved with that. The job actually went very smoothly. Here is the car right after I pulled it into the shop,
The first step is to jack it up and support it on jack stands. Remove the wheel and pull off the brake caliper. Support the caliper with some wire or zip ties. I used wire and put it up on the strut spring.
Remove the axle nut. I have had pretty good success removing these with my impact gun. It worked for this one also. If you don't have an impact gun you may want to get this nut off before you remove the caliper. That way you can have a buddy step on the brake as you use your breaker bar to remove the axle nut.
Here is the old nut and the new nut. Always replace the nut. It's not worth messing with it for 7 bucks. It's also good piece of mind.
Remove the brake pads and then the caliper bracket.
Now you can remove the rotor. It may take a hit or two with a hammer to break it loose. Your almost there now.
Remove the 3 bolts that are on the back side of the hub. Now the fun begins trying to get the hub out of the steering knuckle. I got creative with my rivet gun and was able to get the hub off.
You can see the corrosion that forms after 150,000 miles. It still came off easier than I thought it would. Make sure to be careful with the CV axle. You don't want to damage it.
Make sure you install the metal bracket where it was and then put on the hub. I used some corrosion inhibitor on the axle splines and where the hub presses into the knuckle. I used the bolts to install the hub assembly. Just make sure you tighten the 3 bolts up a little at a time and evenly and you shouldn't have any problems. Mine went together great.
I forgot to mention that I used high strength thread locker on the 3 hub bolts. You don't want them coming loose over time. I also installed the axle nut at this point. Make sure you torque it to factory specs using a new nut. Now you just need to install the rotor, caliper bracket, caliper and your done. This one was a ton easier then the Subaru I did a couple weeks ago.
I also needed to change out the stabilizer links because they were worn out. I used some vice grips to hold the stud and my impact gun made short work in removing the nuts. You can see the difference between the Moog part and the stock one. The Moog part is significantly bigger and has grease Zerk's so you can actually grease them. Make sure you install the link so the Zerk's are facing to the rear of the car.
This is the right hand side. It came off just as easy as the left.
It attaches to the strut and goes down to the stabilizer bar. If you have a clunking coming from your front end, these could be your problem.
The new one is installed and ready to go.
This job went really good. I found that the brakes were just down to the wear sensors on the inner pads so we replaced those while we were at it. I think this was one of the easiest wheel bearing replacements I have done. It has been pretty hot in the garage the last few weeks. Hopefully we get some relief from the heat for a little bit. I hope everyone has an awesome fourth of July. If you live in Utah, take a cruise up to Logan this Friday or Saturday. You can see a bunch of cool hot rods at the Cache Valley Cruise In. It's always an awesome car show. Maybe I will see you there!
Tuesday, July 2, 2013
Getting a STARTer on the shop truck.
I finally saved up enough money to get the starter rebuilt on the old International pickup I bought to use for our shop truck. I have made some decisions on where I want to go with the truck. I think I will do it in stages. Initially I am going to get it running with the original drive train and I decided to leave it 6 volt. The reason I decided to do that is because I have a brand new 6 volt battery that came with the truck and it will be less work up front to get it on the road. I decided to get the starter rebuilt because the Bendix gear was completely stripped and the solenoid was not working. I took it down to A and E Generator and they had all the parts needed to get it rebuilt. They did a great job and the price was right. I couldn't resist taking a picture of their old building with their awesome logo that was painted many years ago. Oh and of Ed of course.
Here is the starter rebuilt and ready to go. This starter is actually about as big as the engine in Ed. Good old 1950 technology!
This is the Bendix gear that was replaced. I was really lucky because the gear was completely shot but the flywheel is in great shape.
I kept it 6 volt for now. When I convert it to 12 volt I will just change out this solenoid with a 12 volt one and run the starter until it goes out. My guess is that it never will.
Here it is in all it's glory! I cant wait until I get some time to install the starter and see if the engine will run. I figure I will get the engine running and then worry about getting the brakes to work.
The first stage of the shop truck has begun.
Here is the punch list for the truck.
1. Get the engine running.
2. Get the truck to stop.
3. Get some 15 inch wheels and tires for it.
4. Lower it.
5. Clean up the interior a little bit.
6. Drive it!
1. Get the engine running.
2. Get the truck to stop.
3. Get some 15 inch wheels and tires for it.
4. Lower it.
5. Clean up the interior a little bit.
6. Drive it!
Subscribe to:
Posts (Atom)


.jpg)